No one reads your Discord Channels anymore? Try the Hidden Threads trick!
You will learn a clever trick to hide long text behind interactive buttons. Keep your channels perfectly clean, and get users to actually click and read what they find interesting.
You spend days setting up a Discord server, typing out important information, and getting the layout just right. Then, a new user joins and immediately asks a question that is clearly answered in your info channels because they did not read a single line of your text.
People skip big blocks of text. If a channel looks like a textbook, users will just click out of it.
To fix this, you can change how you organize your information. In this guide, we will show you how to use hidden threads to split your text into separate, clickable topics.
Instead of crowding a single channel with an endless wall of text, members will only see a clean list of titles. When they want to learn about a specific topic, they click to open that thread, read the details in the side panel, and close it when they are done. It keeps your main channels completely clean and easy to navigate.
When are hidden threads useful?
While this guide focuses on rules, you can use this thread layout for almost any type of information in your server. Here are a few common ways to use them:
- Server Economies: Use separate threads to list shop items, prices, and commands so users don't have to scroll through a massive price sheet in the main chat.
- Game FAQs: If your server is built around a specific game, you can put common questions as the thread titles and keep the answers cleanly organized inside each thread.
- Quick-Start Guides: Break your onboarding process into clear, step-by-step threads like Step 1: Get Roles or Step 2: Read Guidelines so new joins don't get overwhelmed.
- Roleplay Character Selection: Keep your lore organized by putting character classes, factions, or bio templates into their own dedicated threads instead of burying them in a crowded channel.
Let’s get started and look at how to set this up step-by-step.
Creating #rules channel
You can skip this step if you already have a read-only channel on your sever.
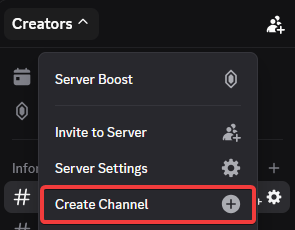
Right-click on your sidebar or click your server menu and select Create Channel.
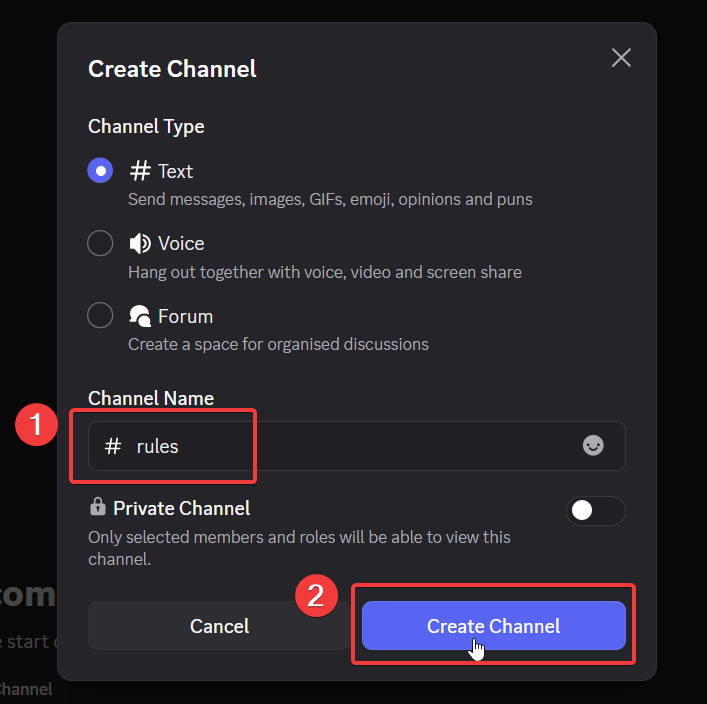
Enter rules (1) in the Channel Name field and click the Create Channel (2) button. Make sure to select "# Text" as the channel type.
Restricting channel permissions
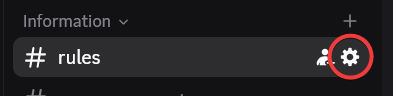
This is a critical step. If general members can type, send random images, or spam emojis in your rules channel, it completely ruins channel purpose. Go to its settings by clicking the gear icon next to your #rules channel.
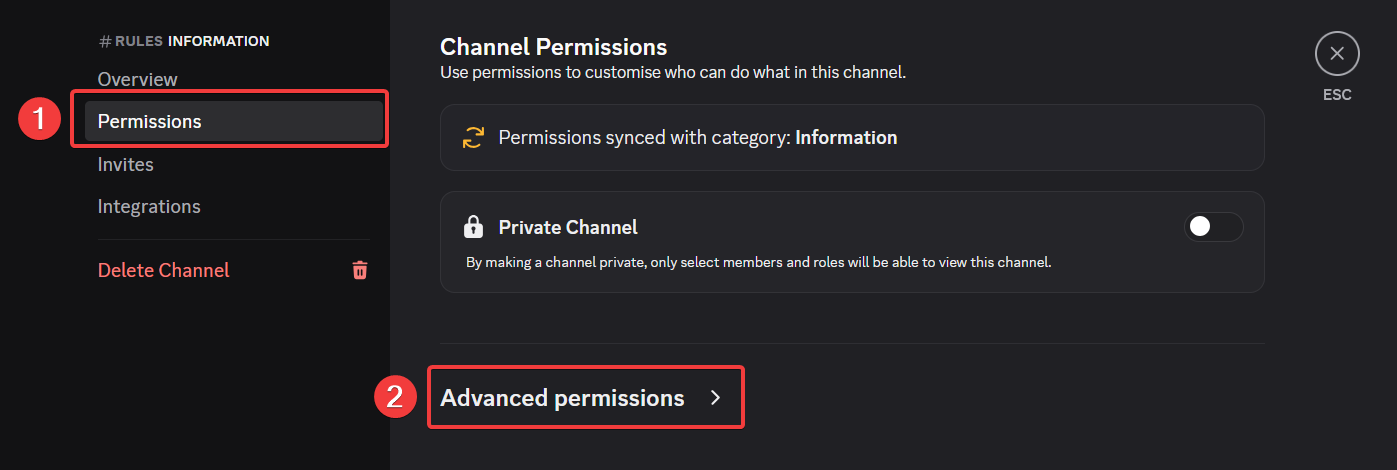
Click on Permissions (1) on the left sidebar, and click on Advanced permissions (2) at the bottom.
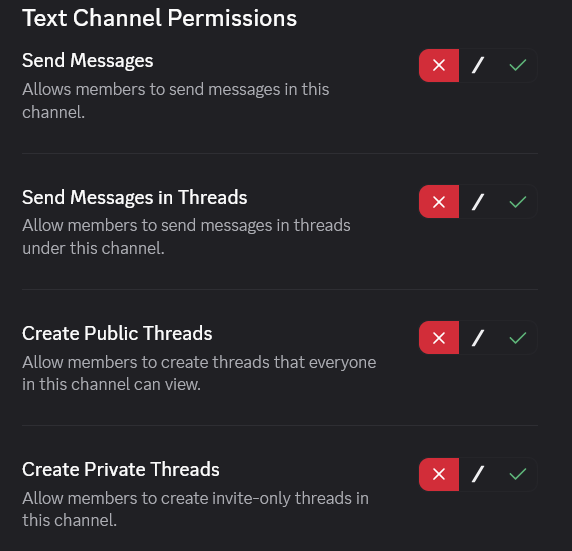
Scroll down the permissions list and make sure to completely disable the following settings for the @everyone role:
- Send Messages (X) - Prevents general typing in the main channel.
- Send Messages in Threads (X) - Blocks users from cluttering the hidden rule threads.
- Create Public Threads (X) - Prevents members from creating unauthorized public sub-channels.
- Create Private Threads (X) - Ensures complete administrative control over thread creation.
By turning these off, you guarantee that only server administrators have the power to post, update, or manage discussions within this space.
Building hidden threads
Now, we are going to create two dedicated threads: one for Text Rules and one for Voice Rules.
In the upper-right corner of your #rules channel, click on the Threads icon.
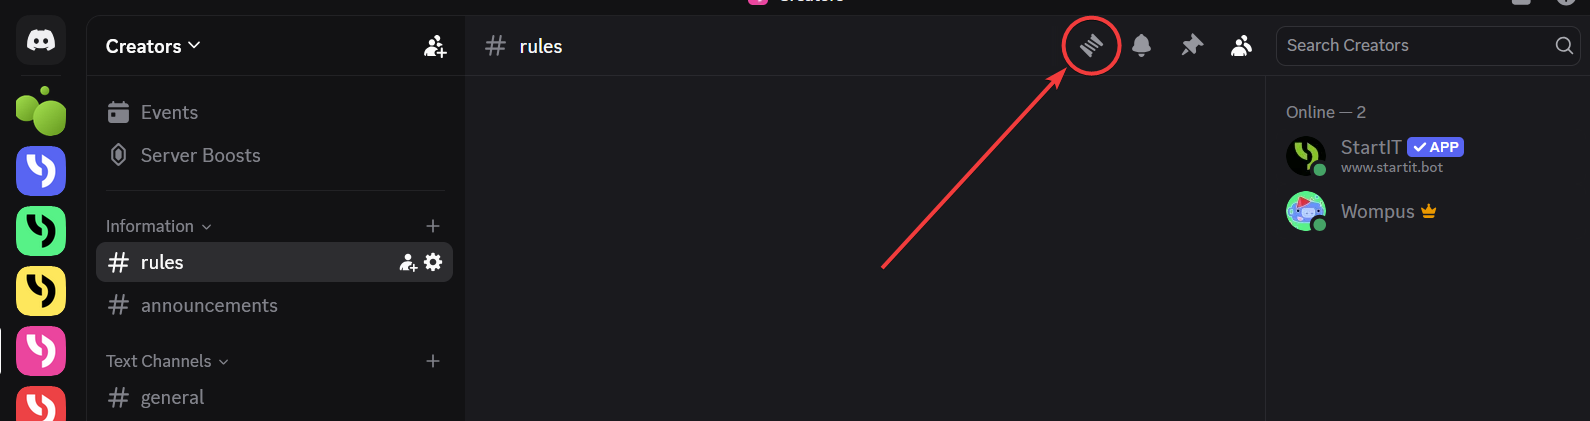
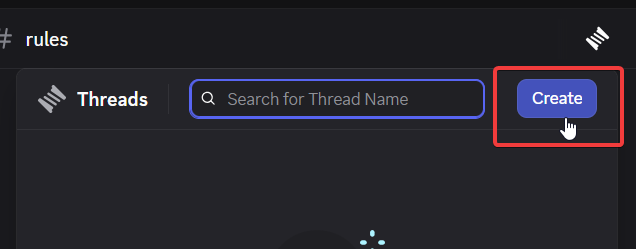
Then click the purple Create button.
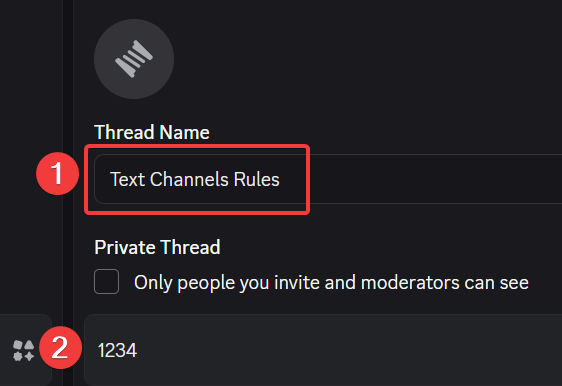
Create the "Text Channels Rules" Thread
To create this thread, we need to send a temporary message to initialize it.
- Name your thread
Text Channels Rules(1) in the Thread Name input. - Type a temporary message like
1234(2) in the text box below. This temporary message is a technical requirement; Discord won't let you create an active thread without at least one message to anchor it to the channel.
Cleaning up noise
Once the thread is established, that placeholder message has served its purpose. We want to delete this manual message immediately for one simple reason: the StartIT bot is going to send a far superior, beautifully designed message in its place.
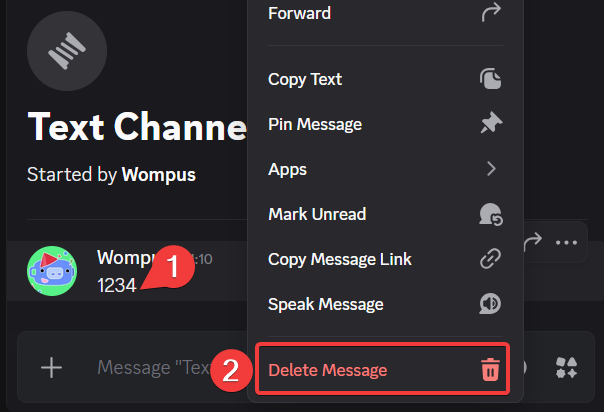
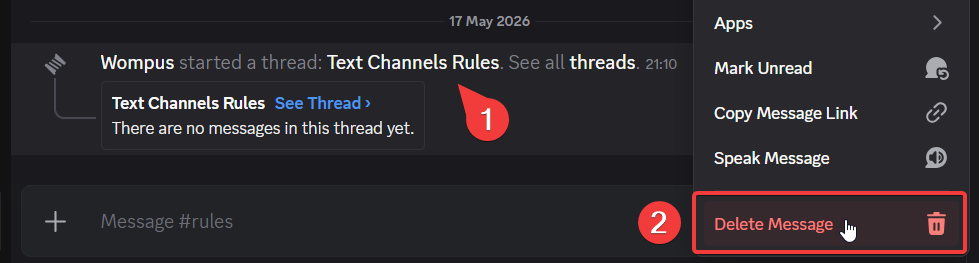
Next, go back to your main #rules parent channel. You will see an automatic system message saying "Wompus started a thread: Text Channels Rules..." (1). This notification creates unnecessary visual clutter. Right-click that message and click Delete Message (2) to keep your main rules channel pristine.
Voice Channels Rules. Once completed, look at your sidebar! You have your #rules channel, and beautifully nested underneath, you have your two active, clean sub-threads ready to be populated.

Crafting Interactive Capsules
Now for the magic. We will use the StartIT bot's Capsule Dashboard to build interactive, structured layouts. Capsules are an improved, modern version of standard Discord embeds. They let you combine text, formatting, and buttons into an attractive, unified design without writing complex code.
Add StartIT to Your Discord Server
Head over to the website: Visit https://startit.bot/ and log in using your Discord account.
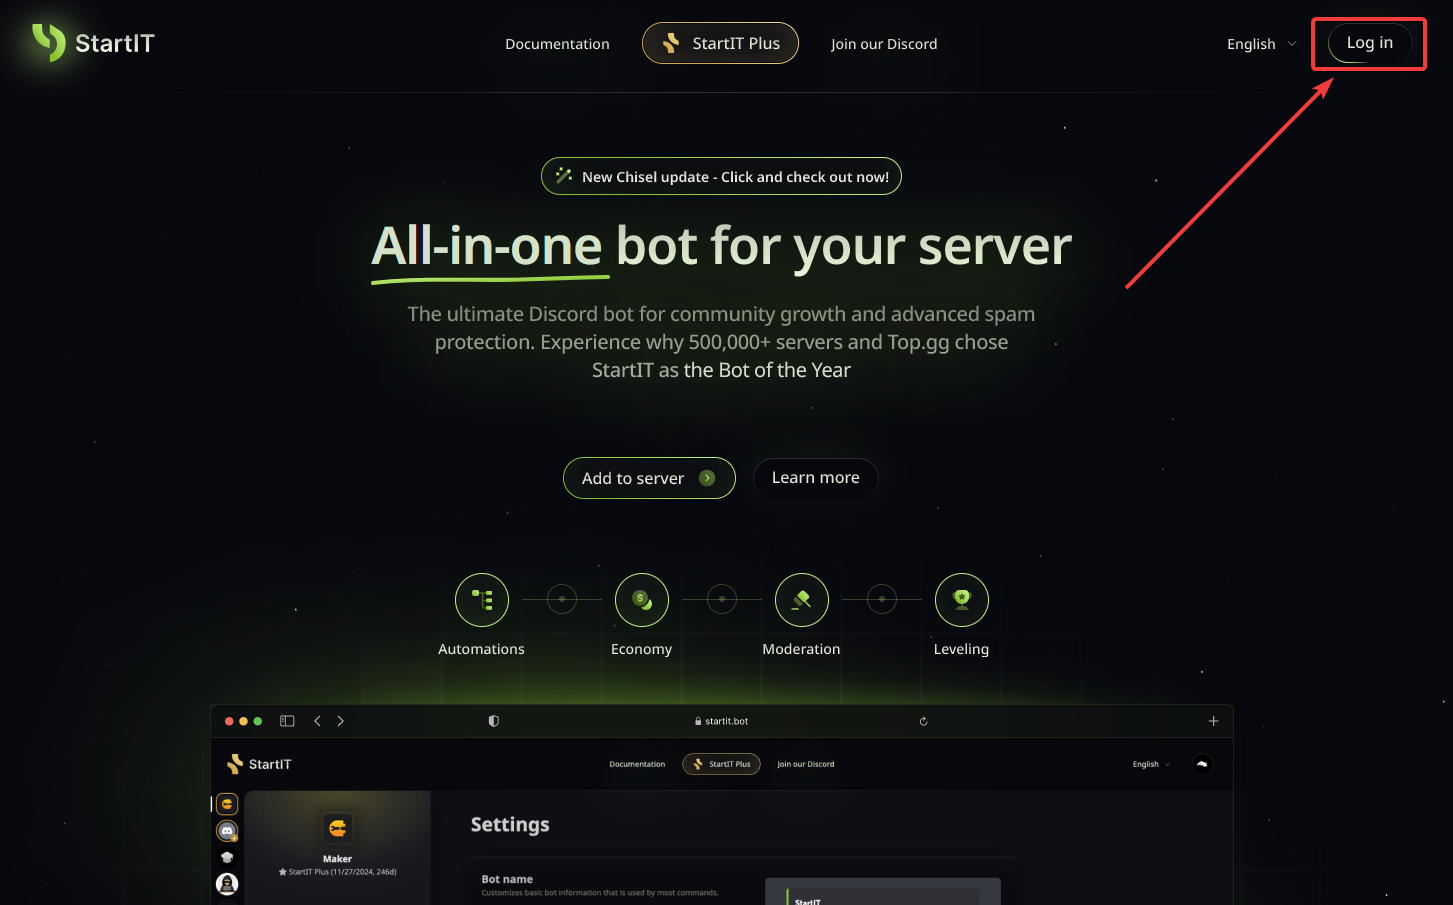
Invite the Bot: Select the server you want to enhance.
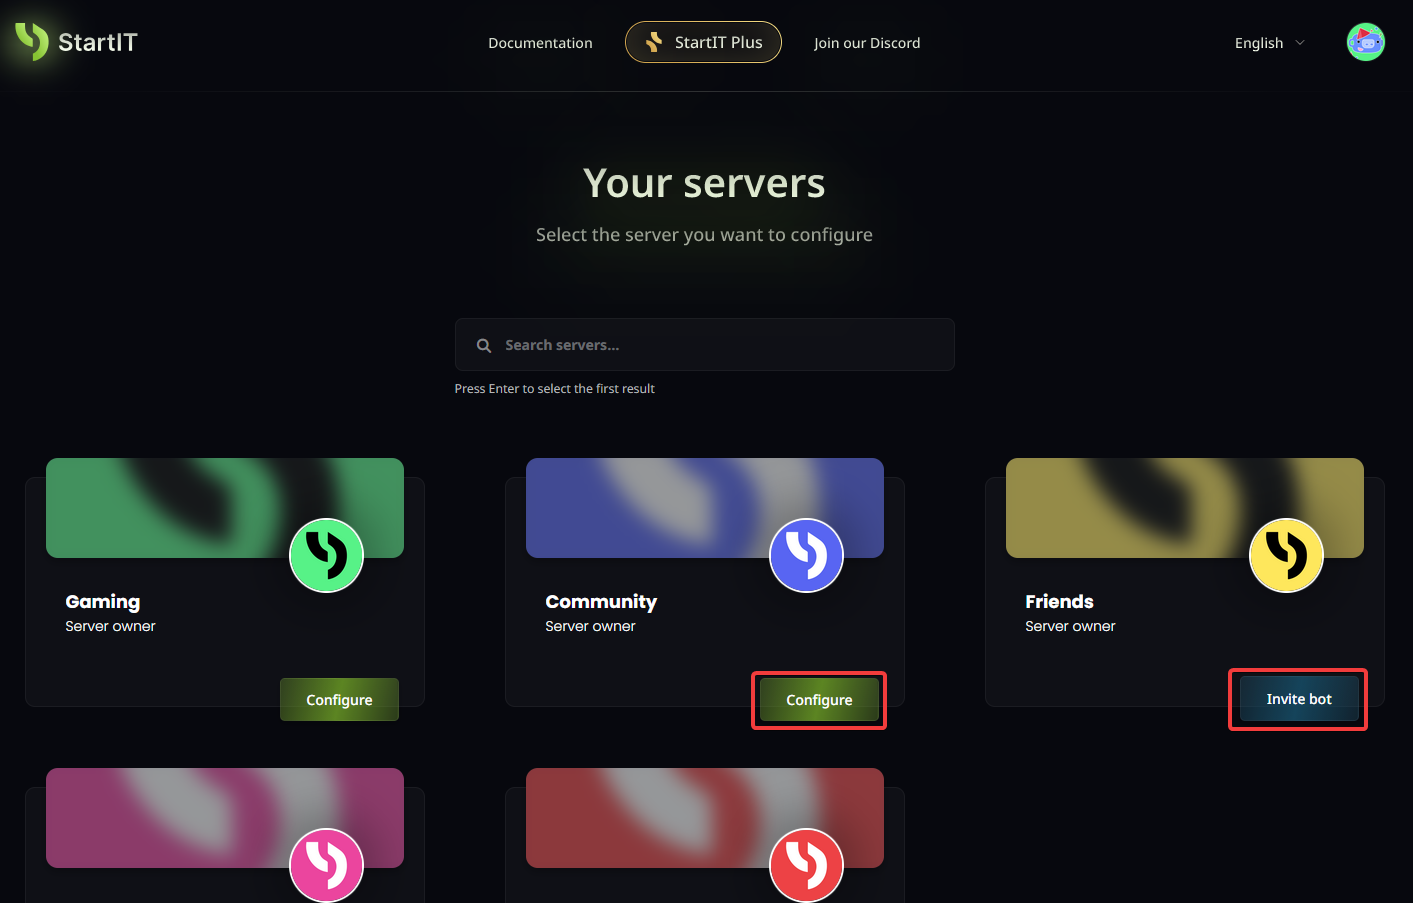
Note: You must have Administrator permissions for the server to appear in the selection list.
Create your first message
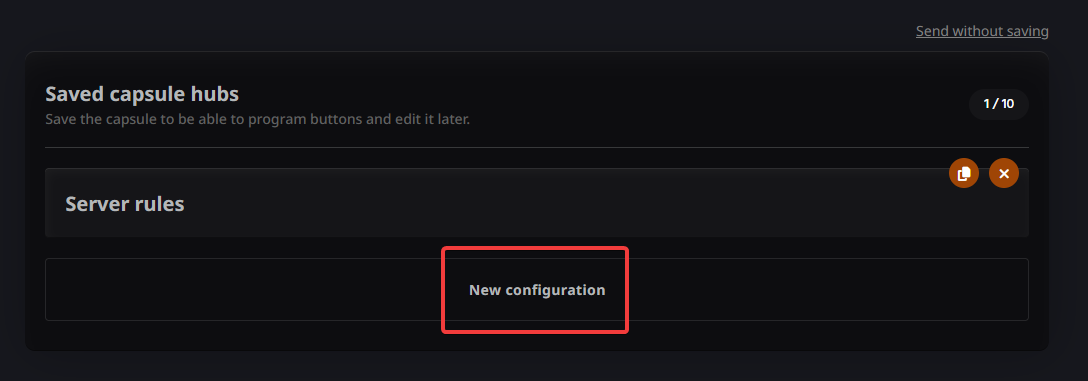
Navigate to Capsules (1) on the left sidebar under the "Server Management" section and click the New configuration button.
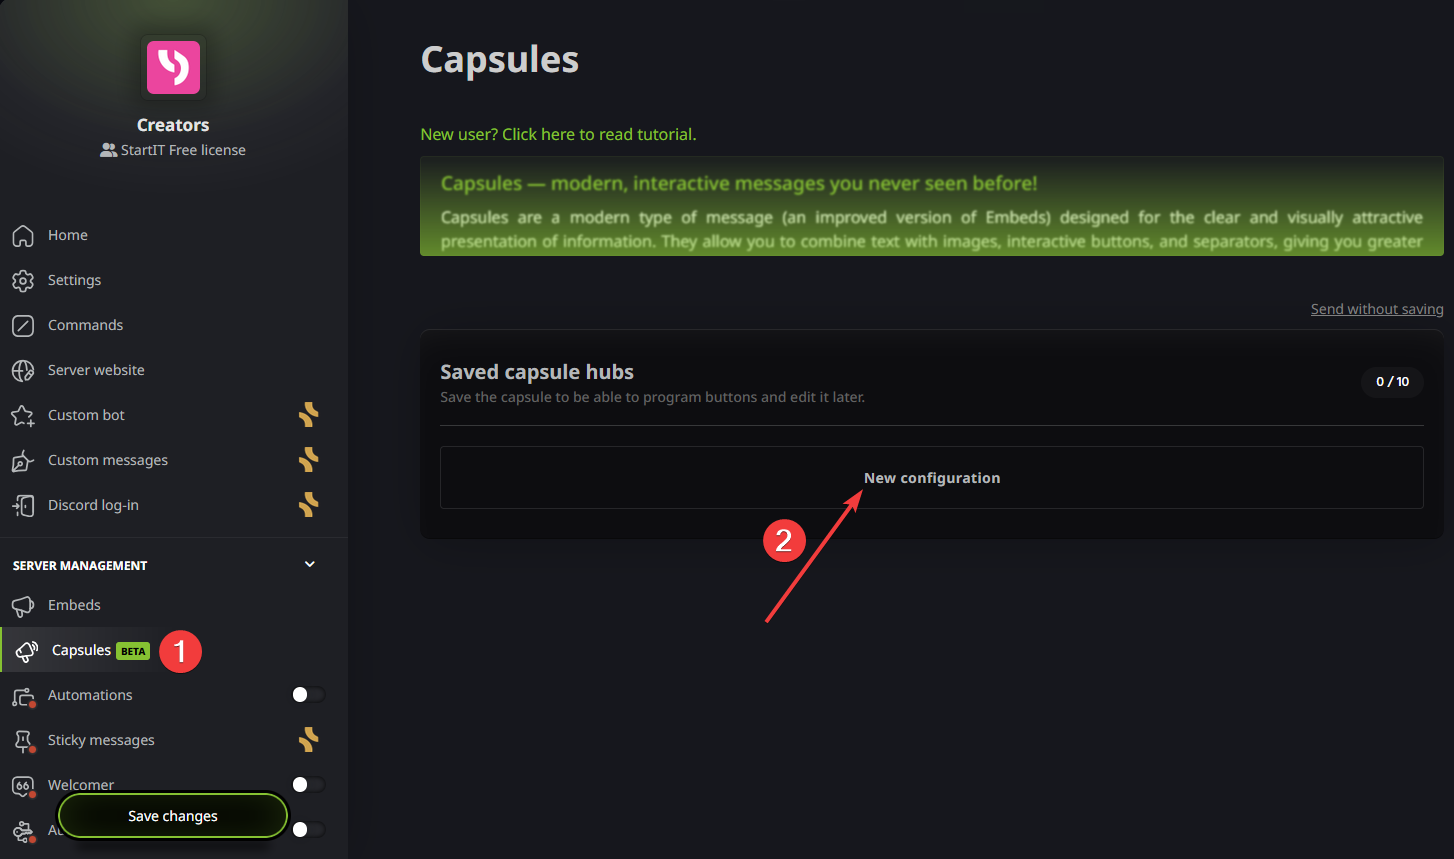
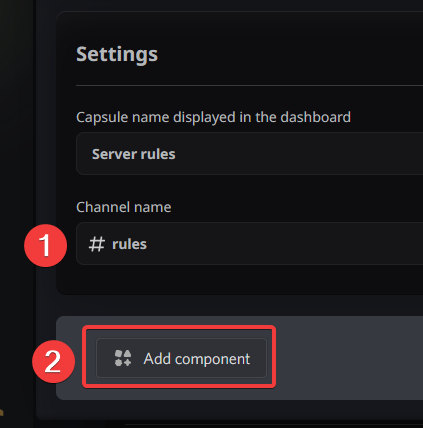
- In the Capsule Name field, write a descriptive administrative name like
Server rules. - Under Channel name, select your target
#rules(1) channel. - Click on the Add component (2) button to start designing your visual card.
Preparing the Container
Containers allow us to divide our rules into separate, visually attractive sections instead of a single giant block of text. By grouping related information, we reduce cognitive load and help users find what they need.
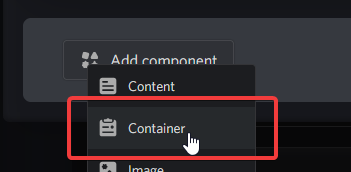
From the component dropdown menu, select Container.
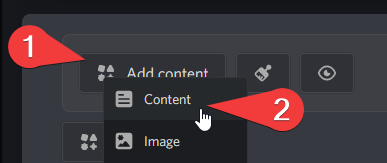
Inside your container, click Add content (1) and select Content (2).
Now, add a short welcoming introduction in the container to describe your chat guidelines. Start with "# TEXT CHANNELS RULES" title.
Repeat this step for the voice channel rules: create a new container, click "Add component" (the button at the very bottom), select "Container" again and add a brief introduction detailing voice chat etiquette and screen sharing rules.

Once both containers have their intro texts ready, let's move on to setting up our interactive button links!
Create interactive button links
Instead of letting users scroll through massive text, let's give them clean action buttons that open our hidden threads.
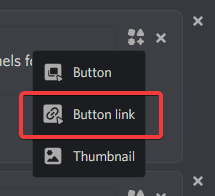
Click the components icon to the right of each container and select Button link to attach a clean interactive button.
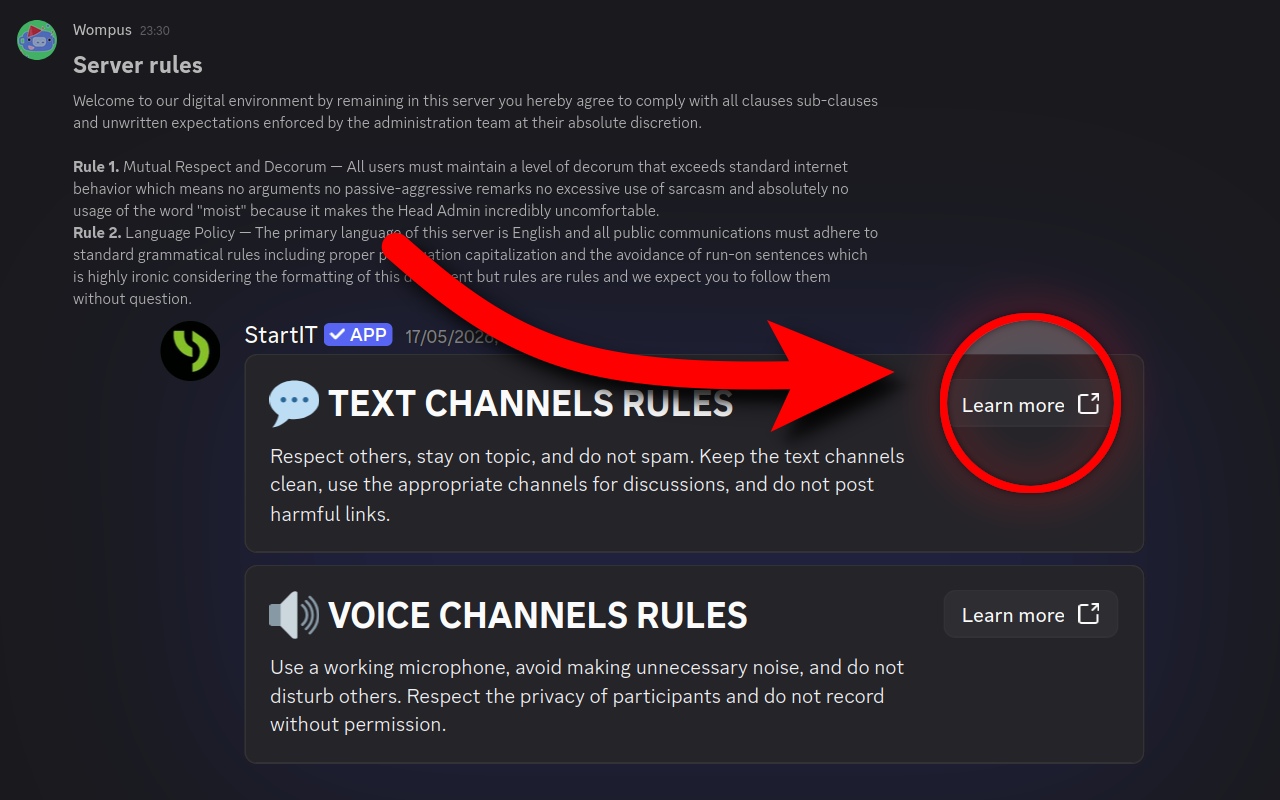
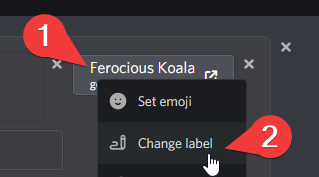
Now click the default button text (1) to customize it. Click Change label (2) and type Learn more.
Now we need to make the "Learn more" buttons open our hidden threads!
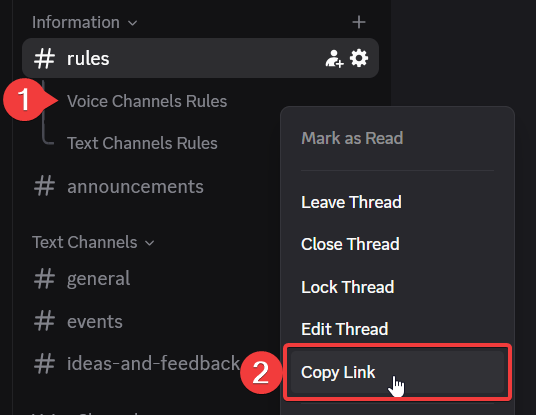
Go back to Discord, right-click on one of the threads (1) on your sidebar, and click Copy Link (2) from the context menu.
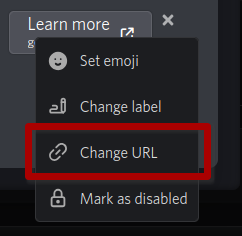
Once you've copied the link, go to your StartIT dashboard. Click the corresponding "Learn more" button inside your container and select the Change URL option. Then, paste the link you just copied into the field.
Now, repeat this exact process for the second thread: right-click the other thread on your sidebar, copy its link, and go back to your StartIT dashboard. Click on the second "Learn more" button inside your other container, select Change URL, and paste that link in. Both buttons are now fully linked to their respective threads!

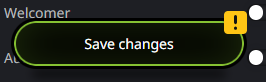
Once you have set up your buttons for both the Text and Voice rules containers, click the green Save changes bar at the bottom of the screen to send messages onto Discord.
You should now see Server rules listed in your main channel. Buttons should also work (currently linking to the empty threads we created). Now, we need to create the actual rules content that will fill the inside of our threads!
Filling in empty threads
Now we are going to put the actual detailed rules inside the threads we created earlier. Don't worry, StartIT makes this super easy because it lets you send rules directly into threads just like normal channels. Click New configuration to continue.
Choose where your rules will go
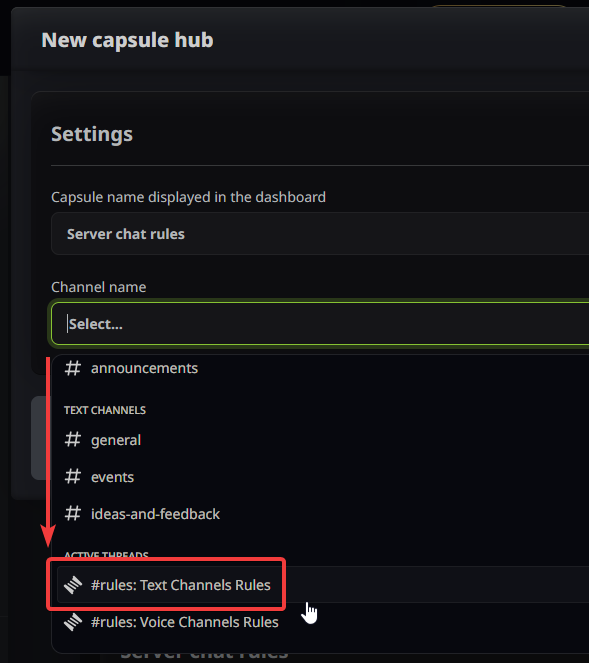
Create a new configuration in your StartIT dashboard and name it Server chat rules.
Under Channel name, scroll down to the bottom list called ACTIVE THREADS. Click on #rules: Text Channels Rules to select it.
Copy and paste your rules
Now, write your rules or simply copy our ready-to-use templates below! We made these templates basic and easy to edit.
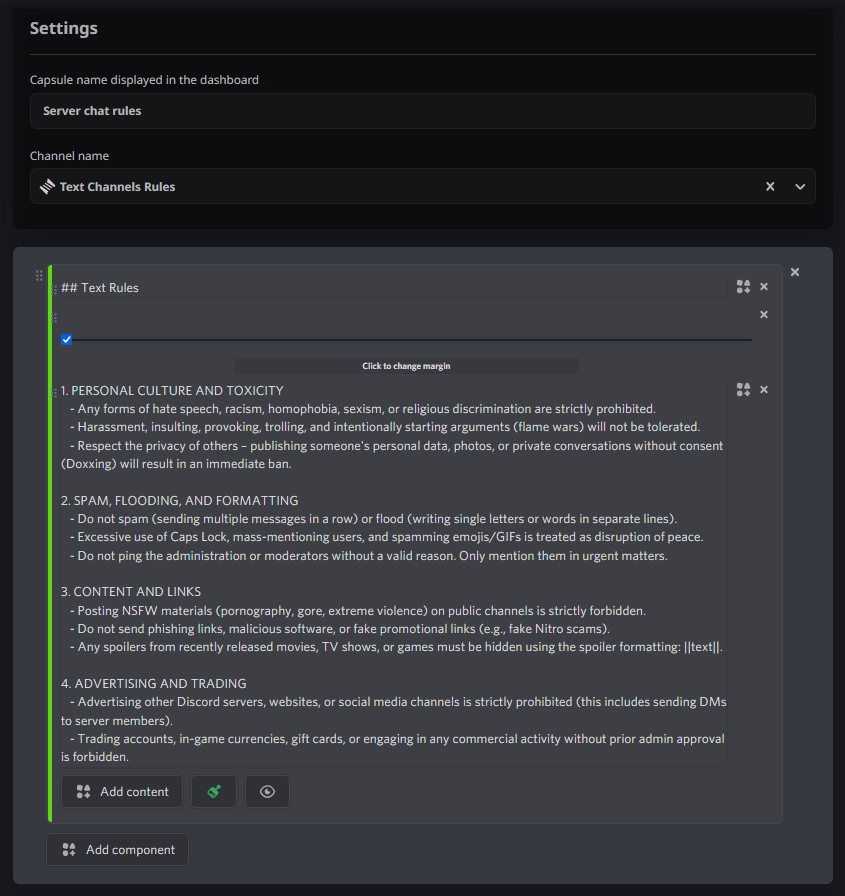
Paste your text rules into your StartIT dashboard editor, optionally add images, separators, headings and configure the colors to match your server's theme.
💬 Text Channels Rules Template
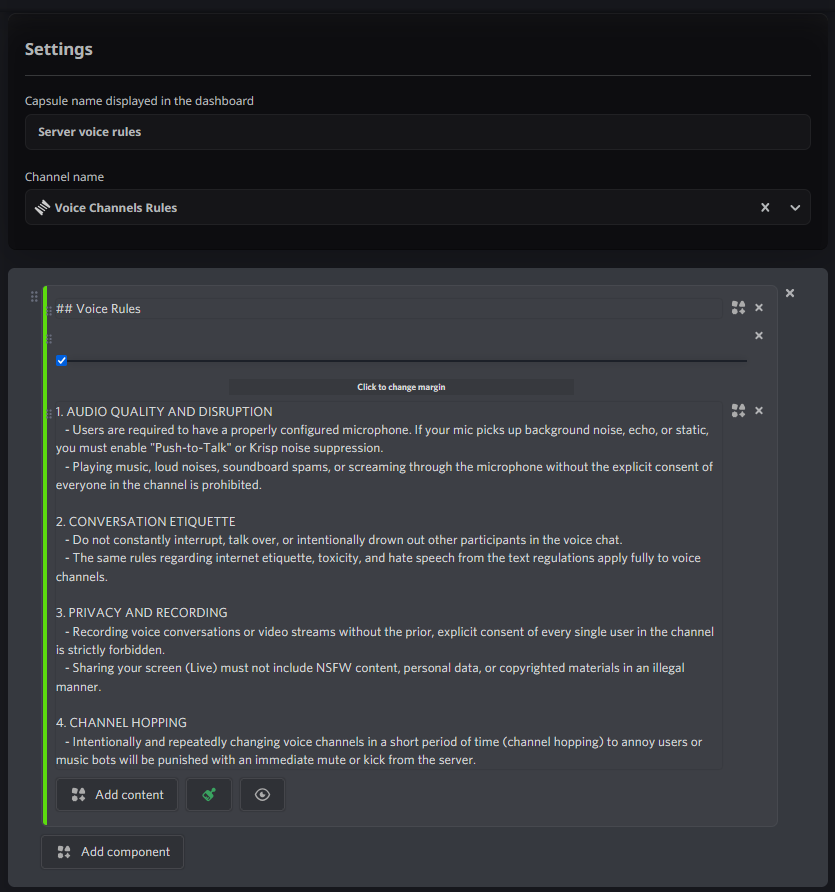
🔊 Voice Channels Rules Template
Create a third capsule named Server voice rules, target the #rules: Voice Channels Rules thread, paste the voice guidelines.
Don't forget saving changes!
Finishing up
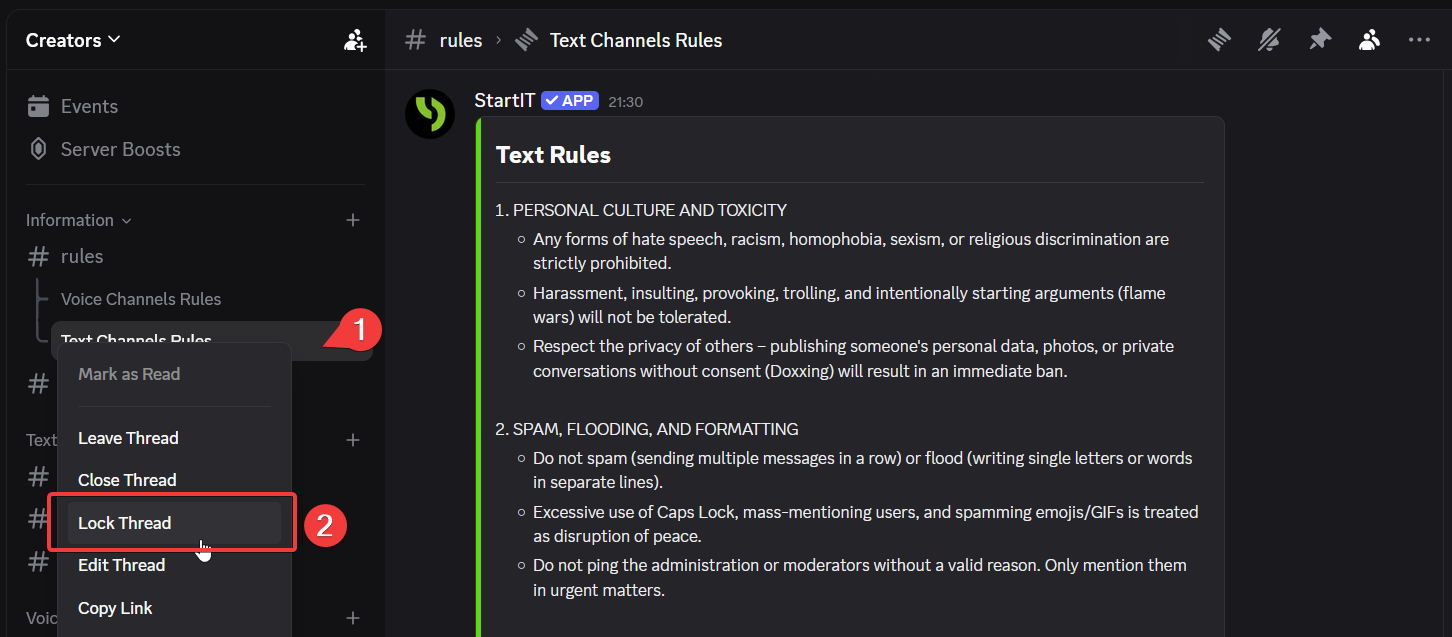
Now that your rules are fully written, let's lock down the threads to ensure that no one can ever type in them, keeping your rules permanently clean and read-only.
- Right-click on your
Text Channels Rulesthread in your sidebar. - Select Lock Thread from the context menu.
- Repeat this step for the
Voice Channels Rulesthread.
The threads listed under your #rules channel on the sidebar are currently only visible to you. Because you created them, you are automatically a "member" of these threads, which keeps them visible in your navigation panel.
To test this layout exactly as your users see it, you can optionally leave the threads. To do that, right-click both of the rules threads in your sidebar and select Leave Thread on each.
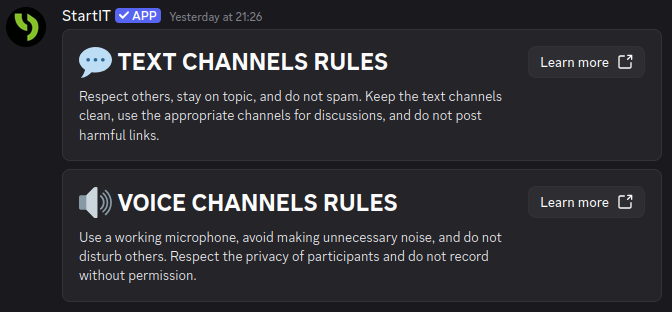
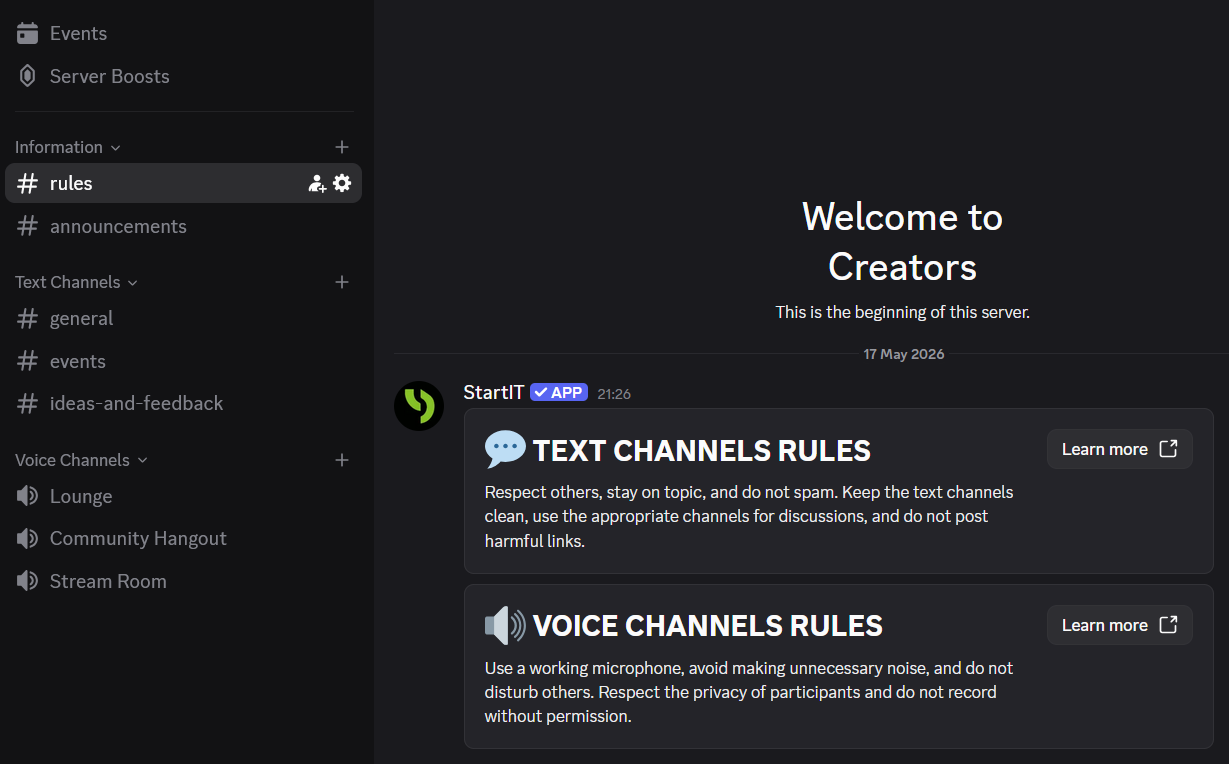
The final result
Here is what your members will see when they enter your server: two gorgeous, minimalist, and interactive cards. If they want to read your text guidelines, they simply click Learn more under Text Rules, and Discord instantly shifts their view to your beautifully formatted, dedicated text regulations thread.
By hiding the heavy text away and using clean interactive buttons, you've transformed a boring text wall into a smooth, professional user experience. This setup eliminates the classic "I didn't know that was a rule" excuse, making moderation easier and helping your community thrive!
Is there a limit to how many hidden threads I can link to a single channel?
Discord allows up to 1000 active threads per server. However, for a clean layout, keep it reasonable.
Can I update the text inside a hidden thread later without breaking the buttons?
Yes. You can edit the content inside the thread at any time in the bot dashboard. As long as you don't delete the thread entirely, the button link remains exactly the same and will never break.
Can I use this same trick for private, staff-only information?
Yes, just create a Private Thread instead of a Public one. To give your staff access so the button works for them, open the private thread, click the + Add button at the top right, and select their role (e.g., @Moderators). Alternatively, just mention the role in the thread chat and delete the message right after; they will stay added, while regular users will just see an error if they try to click the button.
Read more
If you want to unlock the full potential of these buttons and hidden threads, you first need to understand the absolute basics of how the bot builds them. Check out our first guide, where we break down the fundamental building blocks of these automated cards, show you how to create your first layout in under five minutes.